

That single ice cube you have been dropping into your orchid pot might actually be doing more harm than good. It is a common trap for many new plant owners who fear overwatering their delicate new arrivals. We know the disappointment of watching vibrant buds drop shortly after bringing a plant home or feeling lost in a sea of conflicting advice. Learning orchid care for beginners shouldn't be a source of stress or mystery. You can master the art of nurturing these exotic beauties and transform them into long-lasting household favorites with just a few expert adjustments.
This guide simplifies the process by helping you mimic a lush, tropical tree-canopy environment right in your own home. We will replace confusing myths with a confident watering routine and clear steps for successful re-blooming next season. You'll learn exactly how to provide the light and nourishment these elegant plants crave to stay healthy. We are here to help you move from a place of uncertainty to the quiet confidence of a seasoned grower. Let's ensure your blooms stay fresh, vibrant, and breathtaking for years to come.
Key Takeaways
- Understand that orchids are epiphytes that thrive on bark rather than heavy soil; this mimics their natural home in the tropical canopy.
- Ditch the ice cube myth for a thorough "soak and drain" routine that keeps roots lush and hydrated.
- Learn to read your plant’s health through its leaves and roots to catch signs of thirst or overwatering early.
- Discover the simple temperature shift that triggers a spectacular re-bloom and extends the life of your favorite floral gift.
- This guide to orchid care for beginners provides the specialized knowledge you need to keep these sophisticated plants thriving in your urban space.
Understanding Your New Orchid: Why They Aren’t Actually "Hard" to Grow
Orchids often get a bad reputation for being finicky or fragile. In reality, these plants are remarkably hardy survivors that simply follow a different set of rules than your average pothos or philodendron. Most varieties we enjoy at home belong to the vast orchid family and are classified as epiphytes. This means they don't grow in dirt. In their natural tropical habitats, they cling to tree branches and soak up filtered light and moisture from the humid air. When you master orchid care for beginners, you aren't just gardening; you're recreating a tiny slice of a rainforest canopy in your own living room.
If you've received an orchid as a "Get Well" or anniversary gift, your first job is to help it transition to its new home. Many orchids arrive in decorative plastic sleeves or tight wraps. Remove these immediately. They trap stagnant air and excess moisture, which can quickly lead to root rot. If your gift is heading to a local hospital like NY Presbyterian or Columbia, remember that while most wards welcome these elegant blooms, some intensive care areas may have restrictions on live plants. Choosing local NYC delivery from a florist with over 60 years of experience ensures your plant hasn't been stressed by long-haul shipping. A fresh, locally sourced orchid is far more likely to thrive than one that has spent days in a dark, vibrating truck.
Anatomy of a Beginner Orchid
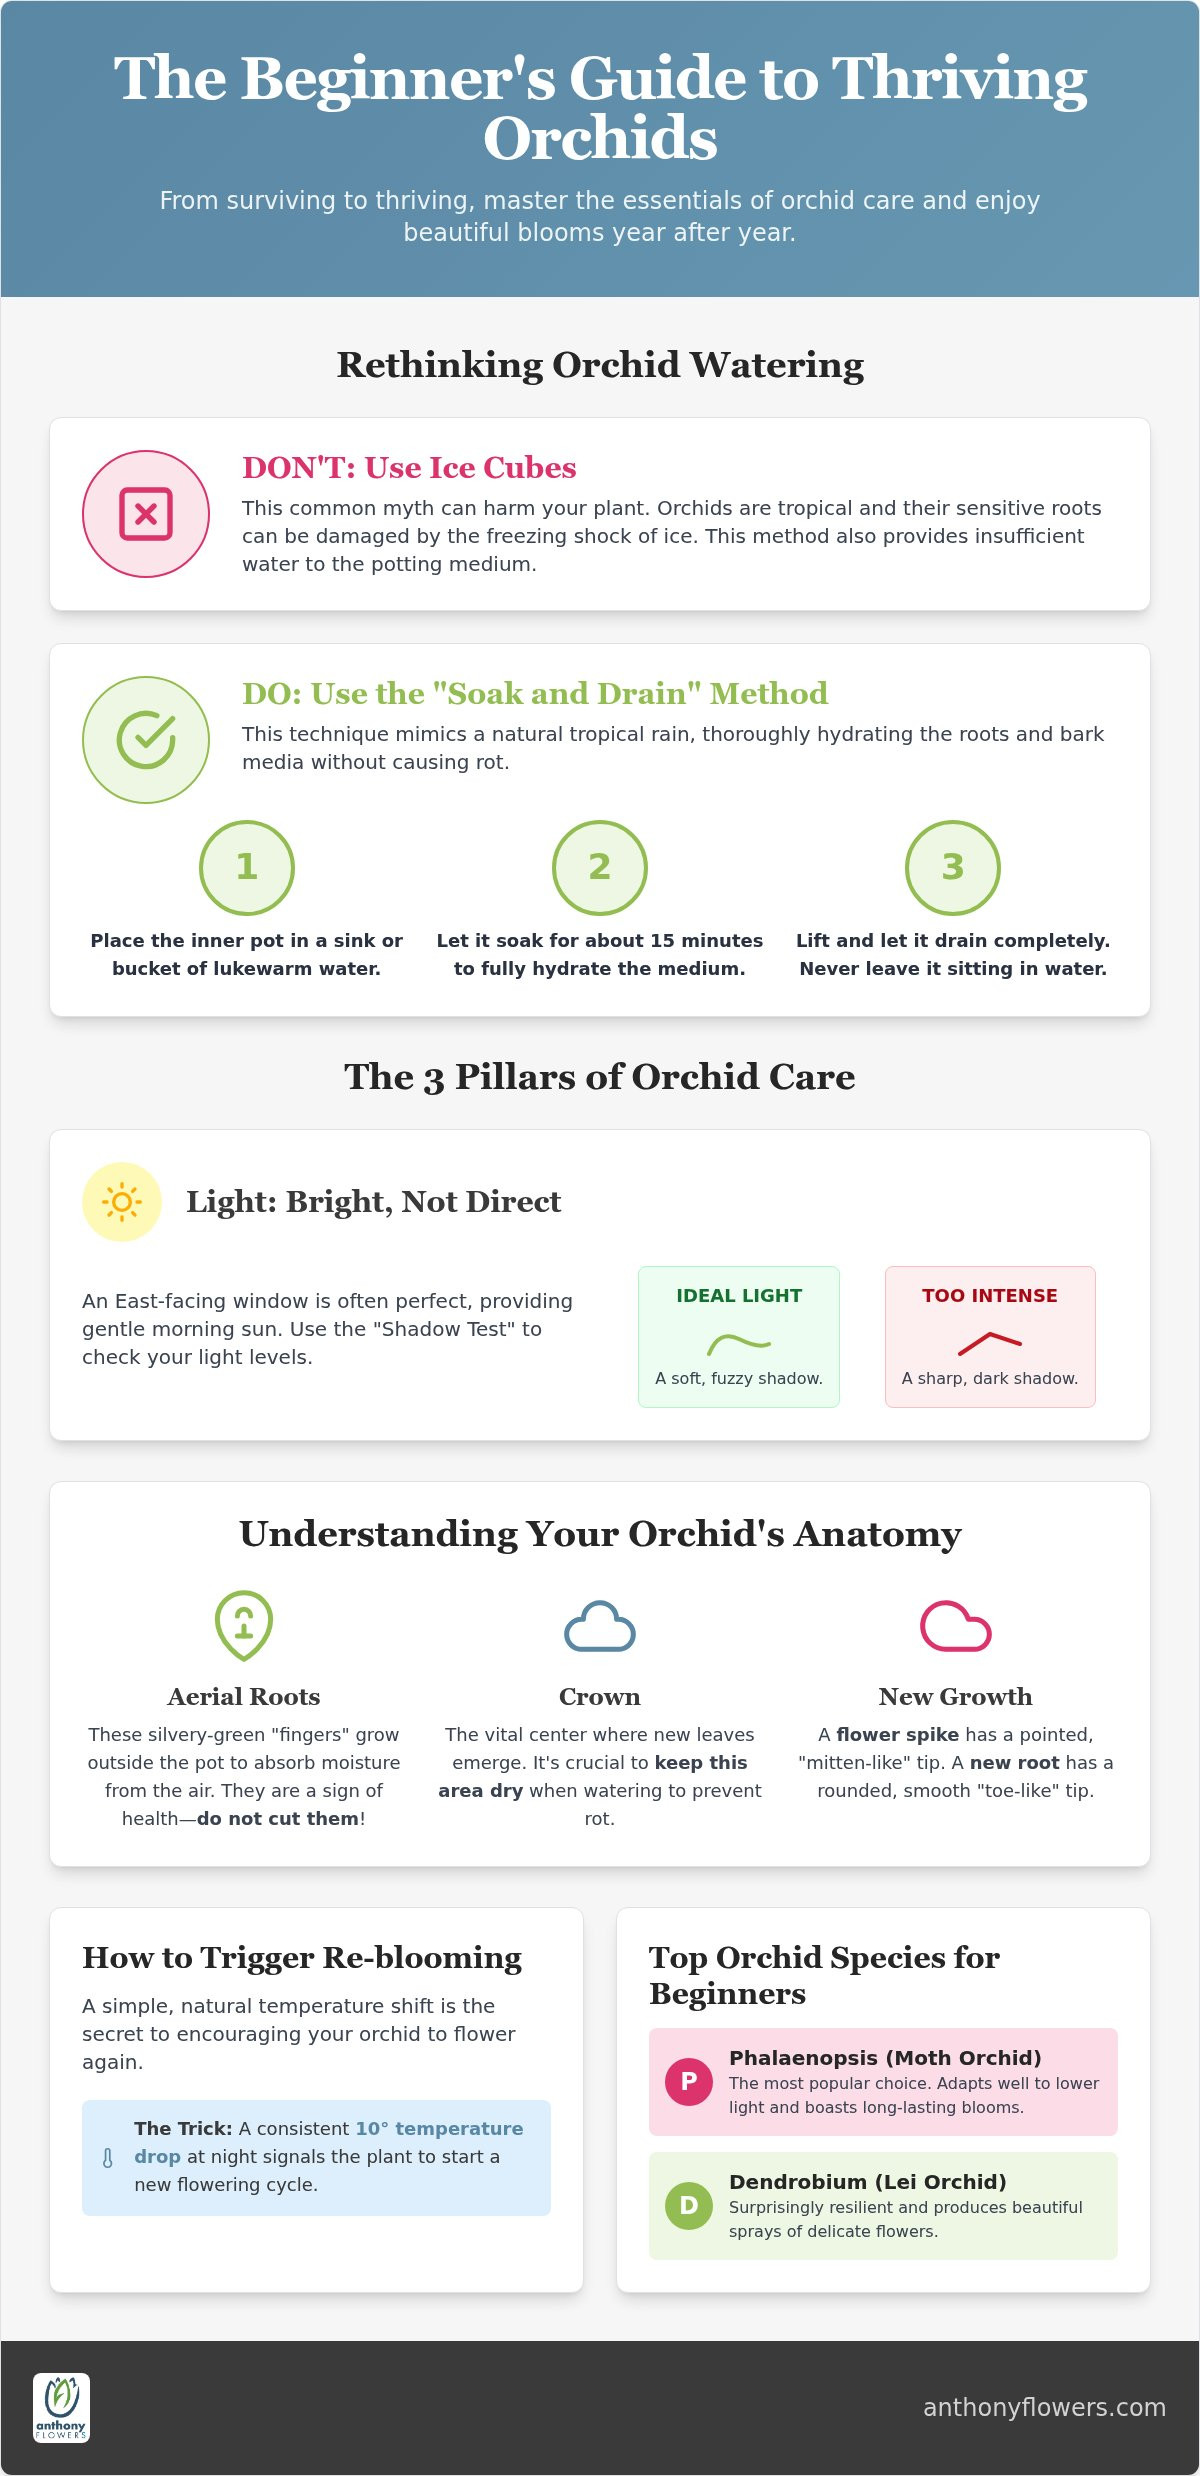
Understanding the physical parts of your plant helps you provide better care. You might notice silvery-green "fingers" reaching out of the pot. These are aerial roots. Don't cut them. They are designed to grab moisture from the air and are a sign of a healthy plant. The crown is the vital center where new leaves emerge; it's essential to keep this area dry when watering. Finally, look closely at new growth. A flower spike usually has a pointed, "mitten-like" tip, while a new root will have a rounded, "toe-like" appearance. Knowing the difference helps you anticipate the next blooming cycle.
The Most Common Beginner Species
- Phalaenopsis (Moth Orchid): This is the most popular choice in NYC flower shops. They are loved for their long-lasting blooms and ability to adapt to lower light levels found in many apartments.
- Dendrobium: Often used in modern floral arrangements, these "Lei Orchids" produce beautiful sprays of delicate flowers and are surprisingly resilient.
Starting with a high-quality plant from a trusted neighborly expert prevents early failure. A healthy orchid from a professional florist will have firm, dark green leaves and a robust root system. This foundation makes orchid care for beginners a rewarding experience rather than a struggle. When you start with a strong plant, half the work is already done.
The Big Three: Perfecting Light, Water, and Humidity in an Urban Space
Successful orchid care for beginners relies on three pillars: light, water, and humidity. In a city like New York, our unique environment presents specific challenges. Radiators blast dry heat all winter while skyscrapers cast long shadows over our windowsills. Balancing these factors is the secret to keeping your blooms vibrant and your plant healthy. It's about finding that sweet spot where your orchid feels like it's back in the tropical canopy.
The NYC Windowsill Guide
Light is the primary energy source for your orchid. An East-facing window is usually the "goldilocks" spot. It provides gentle morning sun without the scorching heat of a late summer afternoon. If you live in a "concrete canyon" where nearby buildings block the sky, you might need to supplement with a small grow light to keep your plant happy. Use the "Shadow Test" to check your spot. Hold your hand about six inches above the leaves. A soft, fuzzy shadow is perfect. If the shadow is sharp and dark, the light is too intense. If there is no shadow at all, your orchid is likely starving for light. Remember that a slight 10-degree temperature drop at night on that windowsill is actually a good thing; it often triggers the plant to start a new flowering cycle.
Mastering the Watering Routine
Forget the "ice cube" myth. These are tropical plants, and they hate the freezing shock of ice on their sensitive roots. Instead, use the "Soak and Drain" method. Once a week, or whenever the potting medium feels dry, place your orchid's inner plastic pot in a sink of lukewarm water for about 15 minutes. This allows the bark or moss to fully hydrate. Afterward, let every drop of excess water drain out completely. Never let your plant sit in a decorative saucer of water. This is the fastest way to cause root rot. To be certain it is time to water, use the "Finger Test" by sticking your finger an inch into the medium. If it feels damp, wait another day. Following these orchid care basics ensures your plant stays hydrated without drowning.
Humidity and airflow are the final pieces of the puzzle. NYC apartments get incredibly dry during the heating season. You can boost humidity by placing your pot on a tray of pebbles filled with water. Just make sure the pot sits on the stones, not in the water itself. Good airflow is also vital because stagnant air invites crown rot. A small fan nearby or a cracked window on a mild day can do wonders for your plant's health. If you are looking for a hardy plant for your NYC apartment, an orchid is a sophisticated choice that thrives beautifully with these simple steps.
Beyond the Basics: Potting, Feeding, and Seasonal Maintenance
Once you have mastered the rhythm of light and water, it is time to focus on the long-term health of your plant. Thriving orchids require a solid foundation and a steady supply of nutrients. Moving beyond the initial survival phase is what truly separates a casual owner from a confident grower. This stage of orchid care for beginners is where you learn to anticipate your plant's needs before they become problems.
Orchid Potting Media 101
Traditional potting soil is the enemy of an orchid. Because these plants are epiphytes, their roots need to breathe. Using dense dirt will suffocate them almost instantly. Instead, most growers use bark chips or sphagnum moss. Bark chips provide excellent drainage and airflow, which is ideal if you tend to be heavy-handed with the watering can. Sphagnum moss holds moisture much longer, making it a better choice for dry NYC apartments. A "clear pot" is a secret weapon for new hobbyists. Being able to see the roots lets you check for health without pulling the plant apart. You should consider repotting every one to two years or whenever the bark begins to break down and smell like compost. When you do move the plant, be gentle. Soak the roots first to make them more pliable and less likely to snap.
Feeding Your Orchid
Orchids aren't greedy, but they do need consistent energy to produce those iconic flowers. The best approach is the "Weekly Weakly" rule. Rather than one big feeding, use a balanced 20-20-20 fertilizer at one-quarter strength every time you water. This mimics the low-level nutrients they would naturally find in rainwater. Once a month, use only clear water to flush the pot. This prevents mineral salts from building up and burning the delicate root tips. This level of attention to detail is why modern floral arrangements NYC professionals love using these plants. They offer a level of longevity and elegance that other flowers simply can't match. By following these principles for beginner orchid growing, you ensure your plant has the fuel it needs for the next big show.
As your flower spikes grow taller, they may become top-heavy. Support them with a simple bamboo stake and soft clips. Place the stake carefully to avoid piercing the roots. This keeps the blooms upright and prevents the spike from snapping under the weight of its own beauty. Seasonal maintenance like this keeps your orchid looking professional and polished all year round.
Troubleshooting 101: How to Save a Struggling Orchid
Even the most attentive plant parent encounters a setback now and then. When your orchid starts to look less than its best, don't panic. These plants are resilient and often provide clear signals about what they need. Mastering orchid care for beginners means learning to decode these messages before a small issue becomes a terminal problem. Your plant communicates through its color, texture, and roots; you just need to know what to look for.
The Quick Diagnostic Table
Use this simple guide to identify common issues at a glance. Remember that wrinkled leaves are often a sign of dehydration. This can be caused by simple underwatering or, ironically, by root rot from overwatering. If the roots are dead, the plant simply cannot drink.
| Symptom | Potential Cause | The Fix |
|---|---|---|
| Dark Green Leaves | Insufficient Light | Move to a brighter windowsill. |
| Purple-Tinged Leaves | Excessive Sunlight | Provide a sheer curtain for shade. |
| Yellow Bottom Leaves | Natural Aging | Allow to fall off naturally. |
| Mushy Brown Roots | Root Rot | Trim dead roots and repot in fresh bark. |
| Falling Buds (Bud Blast) | Environmental Stress | Check for cold drafts or sudden temperature changes. |
Emergency Orchid First Aid
If your orchid has lost its root system to rot, you can try the "Sphag-and-Bag" method. Place the cleaned plant in a clear plastic bag with a handful of damp sphagnum moss. Seal the bag to create a mini greenhouse. This high-humidity environment encourages the plant to push out new roots. However, some signs are more serious. Crown rot, which appears as black mush at the center of the leaves, is often fatal. Similarly, a terminal spike growing directly out of the center crown means the plant has reached the end of its growth cycle. If your plant was a gift that didn't survive a difficult transition, you might look into hospital flower delivery NYC to send a fresh, healthy replacement to a loved one.
Pests like mealybugs look like tiny bits of cotton tucked into the leaf joints. You can easily remove them using a cotton swab dipped in rubbing alcohol. Scale insects, which look like small brown armor-like bumps, can be treated the same way. Consistency is key. Check your plant every few days to ensure the invaders haven't returned. If you're ready to start fresh with a professionally grown specimen, browse our collection of modern flowers and plants to find your next favorite bloom.
The Reward: How to Make Your Orchid Bloom Again
The ultimate reward of mastering orchid care for beginners is the arrival of a brand new flower spike. It is a moment of pure satisfaction that confirms you've successfully recreated a tropical sanctuary in your home. However, once the final petal falls, your plant enters a vital rest phase. This period of dormancy isn't a sign of failure; it's a necessary step for the orchid to gather strength for its next spectacular display. Patience is a virtue during this time, as the plant focuses on leaf and root growth rather than showy blossoms.
To Cut or Not to Cut?
Deciding how to prune your orchid spike depends on your goals for the plant. If you want a faster secondary bloom, try cutting the spike just above the second or third "node" or bump from the bottom. This can sometimes trigger a side branch of flowers within a few months. For a healthier and more robust bloom next year, many experts recommend cutting the spike all the way back to the base of the plant. This allows the orchid to focus all its energy on growing new leaves and strong roots. If the spike has turned completely brown and brittle, the decision is made for you. Cut it off at the base, as a dead spike will never bloom again.
The "Secret Trigger" for a new bloom is often a simple change in temperature. Most common orchids, especially the Phalaenopsis, need a consistent 10-degree drop in nighttime temperature for about four weeks to signal that it's time to flower. In a New York apartment, this often happens naturally in the autumn if you keep your plant near a slightly cool windowsill. This subtle environmental cue tells the plant that the seasons are changing, prompting it to push out a fresh green spike. It is a simple, natural rhythm that brings the elegance of the tropics into your urban space.
Choosing Your Next Orchid
Once you feel confident with your first plant, you might want to expand your collection. Moving from the classic Phalaenopsis to varieties like Oncidiums, often called "Dancing Ladies," or fragrant Cattleyas can add new textures and scents to your home. Starting with a healthy, professionally grown plant from Anthony Flowers provides the best foundation for success. As a family-owned business with over 60 years of experience, we understand how to select and care for orchids that are acclimated to the local climate. Whether you're sending a gift to NY Presbyterian or brightening your own space, a locally sourced plant hasn't endured the stress of long-haul shipping. We invite you to browse our current plant and orchid collection for NYC delivery to find a bloom that will grace your home for years to come.
Bring Lasting Beauty into Your Home
Mastering orchid care for beginners is about shifting your perspective. By swapping heavy soil for breathable bark and choosing a consistent soak-and-drain routine over the ice cube myth, you create a thriving tropical environment. These elegant plants aren't as fragile as they seem; they simply require the right foundation and a bit of patience during their natural rest cycles. Remember that a simple temperature drop is often the only secret you need to trigger a spectacular new season of flowers.
Whether you are celebrating a romantic anniversary or sending a thoughtful "Get Well" wish to NY Presbyterian or Columbia University, a hand-selected orchid is a sophisticated gift that continues to give. At Anthony Flowers, we bring over 60 years of NYC floral expertise to every greenhouse-fresh plant we deliver. We take pride in being your local guide for gifts that carry deep emotional weight and lasting beauty. Send a Stunning, Long-Lasting Orchid Anywhere in NYC Today. With these simple steps, you'll enjoy vibrant blooms that return season after season. You have all the tools you need to become a confident orchid grower.
Frequently Asked Questions
How often should I water my orchid?
Most orchids need watering once every seven to ten days, depending on the humidity in your NYC home. Instead of following a strict calendar, check the potting medium with your finger. If the top inch feels dry, it is time for a soak. Silver-colored roots also signal thirst, while vibrant green roots indicate the plant is well-hydrated. Consistent monitoring is the key to mastering orchid care for beginners.
Can I use regular potting soil for my orchid?
You should never use regular potting soil because it will suffocate the roots. Orchids are epiphytic, meaning they grow on trees in the wild and require significant airflow around their root systems. Standard dirt is too dense and retains too much moisture, leading to rapid root rot. Instead, use a specialized mix of fir bark, charcoal, or sphagnum moss to ensure your plant’s roots remain healthy and breathable.
Why are my orchid leaves turning yellow?
Yellow leaves can signal several different things. If only the bottom leaf is yellowing, it is likely just natural aging as the plant makes room for new growth. However, if multiple leaves turn yellow and feel mushy, you are likely overwatering. If the leaves are yellow and brittle, the plant might be getting too much direct sunlight. Check the roots and light exposure to determine the exact cause of the discoloration.
Do orchids need direct sunlight?
Orchids thrive in bright, indirect light rather than harsh, direct sun. Placing your plant in a spot where it receives filtered morning light, like an East-facing window, is ideal. Direct afternoon sun can quickly scorch the delicate leaves, leaving behind permanent black or brown burn marks. If your NYC apartment lacks natural light, a simple LED grow light placed a few feet away can provide the necessary energy for healthy growth.
How do I know if my orchid is dead or just dormant?
A dormant orchid will have firm, green or silvery roots and a solid green crown at the center. It may look inactive because it isn't blooming, but it is actually gathering energy for the next cycle. If the roots are completely mushy and brown, or if the leaves have all fallen off and the center crown is black, the plant has likely passed. A living orchid will always maintain some firm, green tissue.
Is the "ice cube" method safe for orchids?
The "ice cube" method is generally not recommended by professional florists. These are tropical plants that are highly sensitive to freezing temperatures. Placing ice directly on the roots can cause thermal shock and tissue damage. For the best results, use lukewarm water that mimics a tropical rain shower. This ensures the roots absorb moisture efficiently without the risk of cold-related stress or stunted growth that can occur with ice.
What should I do with the orchid spike after the flowers fall off?
You have two main options once the blooms fade. You can cut the spike back to the base of the plant to encourage a stronger, more vibrant bloom next season. Alternatively, if the spike is still green, cut it just above a node to try for a quicker secondary flowering. If the spike has turned brown and dry, you should always prune it away at the base to keep the plant healthy and tidy.
Can I send an orchid to a patient at NY Presbyterian hospital?
Yes, orchids are wonderful "Get Well" gifts for patients at NY Presbyterian. They are low-pollen and last much longer than traditional bouquets. However, most hospitals prohibit live plants in intensive care units or certain transplant wards for safety reasons. It is always best to check the specific ward's rules before ordering. Our team at Anthony Flowers has specialized in local hospital deliveries for over 60 years and can help guide your choice.


